Upload Component
The upload component adds the capability to receive one or multiple files with the response to your online forms. You could for example use the upload component to enhance your job application form in order to also receive a résumé and cover letter from your applicants. When forms with file uploads are submitted you can easily download the attachments from the submissions page in the FormFinch application.
With the upload component you can receive virtually any type of file: documents, presentations, reports, zip archives, audio and even video files. FormFinch will let you specify the file types you want to receive per upload field on your form, so you have complete control over the submissions you receive.
Adding file upload capabilities to your form
Adding file submissions to your forms can be easily achieved with the following steps:
- Create a new form or open an existing form in the form designer
- Place the upload component on your form canvas. You can find the upload component in the “input fields” section of the form components list.
- After the upload has been added to your form you can use the properties panel to define the file types you want to receive, the maximum file size and the minimum and maximum number of uploads.
- When you are satisfied with your form you can simply press publish and you are ready to receive form submissions with file uploads.
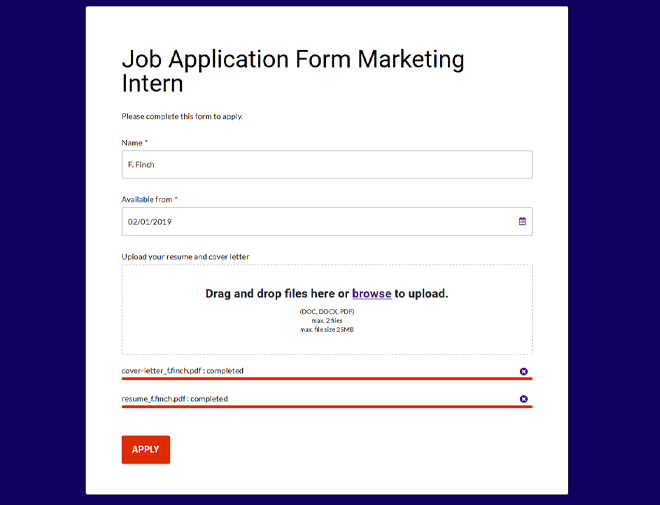
The upload field on your forms
The upload component has a recognizable design and supports drag and drop capability as well as a click-based file upload interaction. Any limits or requirements you have set are presented on the upload area, so your respondent knows exactly what is expected.

When your respondent uses the click-based file upload interaction by pressing “browse”, the file selection dialogue window will open. The file selection dialogue window will respect the file types and selection limits if the browser and operating system support this feature.
When a file is selected the file name will appear on the form including a progress bar and a cancel button. If anything goes wrong during the upload process the respondent will get a clear indication. Also, any files that are accidentally selected twice will be automatically refused by the upload field. Only after the form has been submitted the file uploads will count towards your account upload limit and be made available for download on the form submission page.
Receiving multiple files per form
The form component will allow you to receive multiple files per form. This can be achieved with just one upload field or multiple fields depending on your desired form design. The number of files you can receive per upload component can be set on the properties panel.
The difference between whether you’re using one or multiple upload fields will influence how the files will be made available for download. If you allow multiple files for one upload field all files are downloaded as one zip archive. This can save you time when many files are uploaded. However, if your goal is to receive an exact number of files and specific file types, we advise to use separate fields for each file type. For example: if you want to receive exactly one image and one pdf, you will use two separate upload fields.
Warning: the total upload amount per field in one submission may not exceed 2 Gigabytes regardless of the number of files allowed. Assuming your account storage limit also allows for these uploads.
Specifying accepted file formats
Oftentimes you will want to specify the file formats you want to receive. Not only will this guarantee that you have the software to open the files, but it also helps the person who fills in your form to know what you expect. To go back to the job application form example; do you only want a résumé and cover letter in either docx or pdf format or would you also want to receive a video in which the applicant presents themselves?
On the component property panel in the form designer you can change the set of file extensions to limit the file formats you will receive. Any limitations of allowed file type and file size will be shown in the drag-and-drop area of the upload field, so whoever views your form will know what will be accepted.
The list of predefined file extensions form which you can choose from is as follows:
- Documents
- doc, docx
- odt
- xls, xlsx
- ppt, pps, pptx, ppsx
- Images
- jpg, jpeg
- gif
- png
- Video
- mp4, m4v
- mov
- avi
- ogv
- Audio
- mp3
- m4a
- oga
- wav
- Other
- Zip
Adding custom file formats
The list of predefined file formats covers the most popular file types and we understand that you might want to add other file formats for your specific needs. Therefore, the component properties panel will also let you specify additional file types through input of a comma separated list of file extensions.
Tip: You don’t have to worry about case sensitivity or using a dot prefix. Additional file types are treated case-insensitive and dot prefixes are automatically added when required.
Upload storage limit
The number of uploads you can store in your account is limited by your FormFinch subscription. Only the actual file uploads will be counted towards this limit and it does not include other submission data or for example images on your forms.
Warning: Just like published forms the account storage space limit is not a monthly limit.
On the FormFinch dashboard you can keep track of the storage space amount you have in use and how much you have remaining. The total upload size per form can also be seen on the submission overview page.
When the upload storage space limit has been reached all forms with an upload component will stop accepting new submissions. If you need to create more space for uploads on your account, you can either delete form submissions or upgrade your account.
Tip: Always make sure that your account has enough storage space to receive uploads, submissions that are larger than the remaining storage space will be automatically refused.
The storage space limit is counted in megabytes (MB). The definition of the different units (KB, MB and GB) is:
- One kilobyte KB (1024 bytes)
- One megabyte MB (1024 kilobytes)
- One gigabyte GB (1024 megabytes)
Only the storage space for uploads that are submitted and accepted will be counted towards your account limit. If multiple files are uploaded and the files are combined in a zip archive only the actual zip archive will be counted.